UltraSPARC Module Installation
E3x00-6x00 UltraSPARC Module installation methods are:
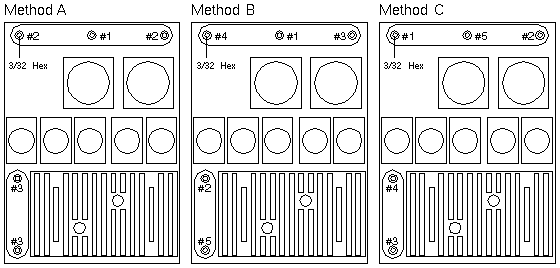
Method A
- Finger tighten all screws following the sequence #1, #2, and #3.
- Tighten screws #1, #2, and #3 almost all the way.
- Tighten screws #1, #2, and #3 until medium resistance is met.
- Finally, tighten screws #1, #2, and #3 an additional 3/4 turn.
Method A References
 Ultra Enterprise 3000 System Manual, 802-6051.
-
Ultra Enterprise 4000/5000/6000 System Manual, 802-3845.
Method B (installation method from September 1997 to September 1998)
- Finger tighten all screws.
- Tighten screws #1, #2, #3, #4, and #5, in sequence, to 3 in-lb (.34Nm).
- Tighten screws #1, #2, #3, #4, and #5, in sequence, to 6 in-lb (.68Nm).
Method B References
-
Ultra Enterprise CPU Installation Guide, 802-5031.
-
Ultra Enterprise 3000 System Manual, 802-6051.
-
Ultra Enterprise 4000/5000/6000 System Manual, 802-3845.
-
Enterprise 3500 System Reference Manual, 805-2630.
-
Enterprise 4500/5500/6500 System Reference Manual, 805-2632.
-
Ultra 3000/4000 Module Installation, 805-0323.
-
4 Mbyte UltraSPARC II Installation Guide, 805-1150.
-
CPU Module Installation Guide, 805-7345.
-
Torque Screwdriver for UltraSPARC Module Installation, 805-2634.
Method C (Preferred installation method after September 1998)
- Finger tighten all screws.
- Tighten screws #1, #2, #3, #4, and #5, in sequence, to 3 in-lb (.34Nm).
- Tighten screws #1, #2, #3, #4, and #5, in sequence, to 6 in-lb (.68Nm).
Method C Reference
-
CPU Module Installation Guide, 805-7345.
UltraSPARC Module Installation
E10000 UltraSPARC Module installation methods are:
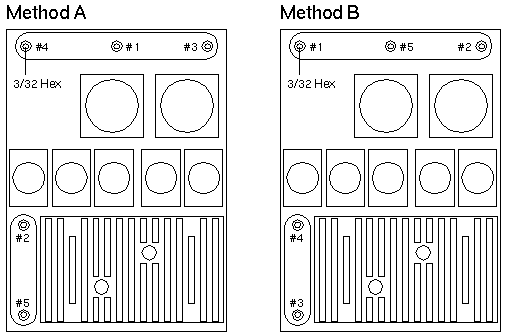
Method A (Installation method before July 1998)
- Remove the blue plastic strip from the system board thermal pad.
- Wipe the system board gold pads with a lint-free non-abrasive cloth.
- Wipe the module connectors with a lint-free non-abrasive cloth.
- Finger tighten all screws.
- Tighten screws #1, #2, #3, #4, and #5, in sequence, to 3 in-lb (.34Nm).
- Tighten screws #1, #2, #3, #4, and #5, in sequence, to 6 in-lb (.68Nm).
Method A References
-
Enterprise 10000 Component Replacement Guide, 805-0311.
-
Enterprise 10000 System Service Manual, 805-2917.
-
Enterprise 10000 333MHz Upgrade Instructions, 805-4500.
Method B (Preferred installation method after June 1998)
- Remove the blue plastic strip from the system board thermal pad.
- Wipe the system board gold pads with a lint-free non-abrasive cloth.
- Wipe the module connectors with a lint-free non-abrasive cloth.
- Finger tighten all screws.
- Tighten screws #1, #2, #3, #4, and #5, in sequence, to 3 in-lb (.34Nm).
- Tighten screws #1, #2, #3, #4, and #5, in sequence, to 6 in-lb (.68Nm).
Method B References
-
Enterprise 10000 System Service Manual, 805-2917.
-
Enterprise 10000 333MHz Upgrade Instructions, 805-4500.
-
System Board Installation and Configuration Guide, 805-7189.
|
